Pages

Labels

Friday, July 22, 2011

Plus One Button – Firefox Add-on to +1 Any Webpage


Certainly, there are various Google+ extensions for Google Chrome browser unlike Firefox. I just came to know about a Firefox add-on which is actually not related with Google+ but just lets you easily +1 any site or webpage directly from address bar in Firefox. The +1 button is a shorthand for "this is pretty cool" or "you should check this out."
Plus One Button extension for Firefox lets you recommend any favourite site or interesting stuff by clicking the +1 button from address bar. You can +1 any webpage using this add-on without waiting for the webmaster of the site to add +1 button first. The +1’s made using this extension appears in the +1’s tab on your Google+ profile. You can do +1 and Undo +1 using this button (shows +1 counts too). Your +1′s can help friends, contacts, and others on the web find the best stuff when they search Google.
Plus One Button_Firefox add-on

Tulalip: Microsoft’s “Secret” Social Networking Project?

Few days back Microsoft “accidently” published a secret project named “Tulalip” which by it’s looks seems to be somekind of social networking site. FYI the word Tulalip is referred to a group of Native American peoples from western Washington state in the United States. Strange enough, Tulalip gives Facebook and Twitter log-in option and the tagline suggests it to be incorporated with Bing search (sounds like Google +1?). Here take a look at the pic:
The Tulalip project WAS accessible on socl.com, but now the website reads this:
Thanks for stopping by.
Socl.com is an internal design project from a team in Microsoft Research which was mistakenly published to the web.
We didn’t mean to, honest.
With the buzz generated by Google+ it is quite likely that Microsoft too wants a pie (bigger than what it has in Facebook :P ) out of the Social Networking. Do express your views on the latest war on social networking and in the near future which one has the potential to take over the cyber world.

Monday, July 11, 2011

How to Access Another Computer's Disk Drives from Your Laptop


12 of 14 in Series: The Essentials of Networking with Your Laptop with Windows Vista
You can use your laptop to access another computer's disk drives over a network. To be more specific, however, you don't really access the entire disk drive. No, only specific folders on the drive are up for sharing. Even then, your access may be restricted by password, or you can only read, and not write or modify, any files in that folder.
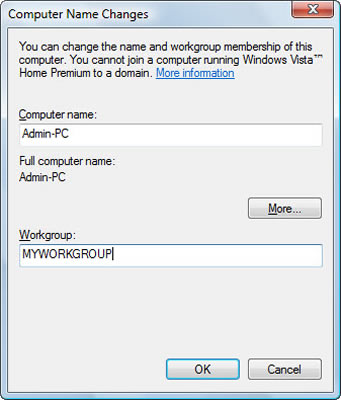
No matter what, if a computer user shares a folder on the network, that folder shows up as available for your laptop to use. Choose Control Panel from the Start menu, and then choose either Network Center (Vista) or Network Connections (XP).
image0.jpg
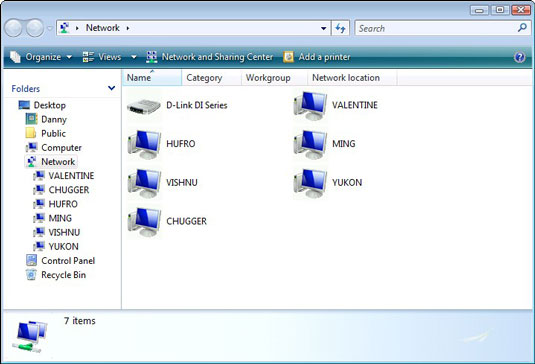
In Windows Vista, open a computer icon in the Network window, shown above, to see whether any folders or disk drives are available.
image1.jpg
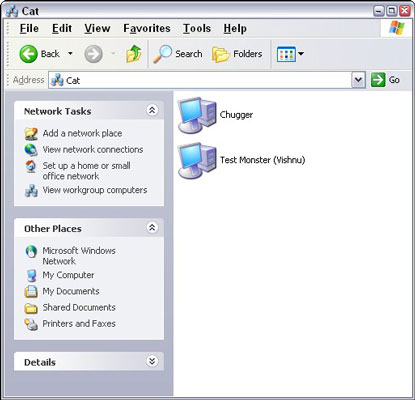
In Windows XP, shared resources are listed directly in the My Network Places window, as shown above.
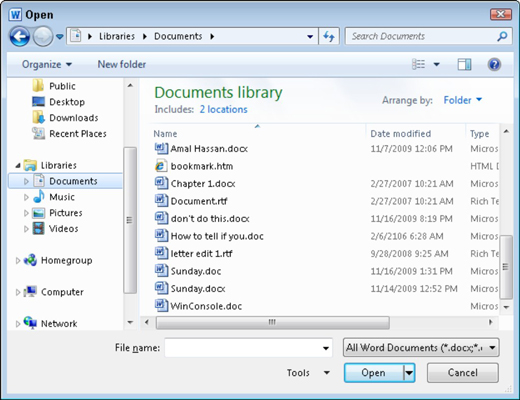
To access a specific folder, double-click to open it, just as you would open any folder on your own hard drive. The contents of that folder are displayed on the screen, just as though it were a folder on your laptop's hard drive. Remember that the folder isn’t on your hard drive; it's a folder elsewhere on the network.
If the folder is password-protected, you're asked to provide a password for access to the folder.
After the network folder is open, you can access files in the folder just as though they were on your own laptop. Note that some folders can be shared as read-only, in which case the files and folders cannot be renamed or deleted or their contents modified.
Remember to practice polite network etiquette and close a network folder when you’re done using it. If you forget and don't close the folder, a connection still exists between your laptop and the computer sharing that folder. If so, an error message may appear if the network connection goes down or the other computer disconnects from the network.

How to Open a Non-Word Document in Word 2010


The Word document format is popular, but it's not the only word processing document format available. Word 2010 accepts these formats and allows you to save your documents in those formats, if you want. Word can magically open and display a host of weird, non-Word documents:
1

In Word, give the Open command.

For example, you can use the Ctrl+O keyboard shortcut. However you do it, the Open dialog box appears.
2

Click the Files of Type button and select a file format from the drop-down list that appears.

By choosing a specific file format, you direct Word to narrow the number of files displayed in the Open dialog box. Only files matching the specific file format are shown.
If you don’t know the format, select All Files from the drop-down list. Word then makes its best guess.
3

Select the file from the list.

Alternatively, you can work the controls in the dialog box to find another storage media or folder that contains the file.
4

Click the Open button.

For some document types, Word displays a special file conversion dialog box that lets you preview the document.
5

If the file conversion dialog box appears, click its OK button.

The alien file appears onscreen, ready for editing, just like any other Word document.
Don’t blame yourself when Word can't open a document. Many, many file formats are unknown to Word. When someone is sending you this type of document, ask them to resend it using a common file format, such as HTML or RTF.


Read more: http://www.dummies.com/how-to/content/how-to-open-a-nonword-document-in-word-2010.html?cid=dn_related#ixzz1RnS9PprU

How to Set Up Multiple Monitors with Windows 7

By Woody Leonhard
Windows 7 makes working with multiple monitors easier than ever. Although previous versions of Windows will allow you to use multiple monitors, Windows 7 allows you to really control the display by changing the resolution, orientation, and appearance of items in each monitor.
Once you've plugged in all the monitors you want to use and hooked them up to your computer,
  1. Right-click in any blank place on the Windows 7 desktop and choose Screen Resolution.
    image0.jpg
    You see the Display Settings dialog box, where you can set up multiple monitors.
  2. Click the 1 box to set up your first monitor and 2 to set up the second.
    You can set up as many as four monitors.
    If you can’t figure out which monitor is which, click the Identify Monitors button. Windows 7 puts a big 1 on the actual Monitor 1 and a big 2 on Monitor 2.
  3. You can also choose where to show the primary desktop.
    You have several options for each monitor.
    Setting NameShown on Monitor 1Shown on Monitor 2
    Duplicate These DisplaysThe usual Windows desktopExactly the same as Monitor 1
    Extend These DisplaysThe usual Windows desktopA blank area where you can drag and drop anything you like; behaves as though it’s to the right of Monitor 1
    Show Desktop Only on 1The usual Windows desktopNothing
    Show Desktop Only on 2NothingThe usual Windows desktop
  4. To change the orientation of one of the monitors, click the desired monitor and select the desired orientation from the drop-down box.
    Windows 7 allows you to have one monitor in typical landscape view and the other rotated to portrait view, which is particularly handy for document viewing.
  5. To change the resolution on either display, click the desired monitor and then adjust the resolution using the vertical slider.
    image1.jpg
    If Windows 7 properly identified your monitor and you have a sufficiently powerful video card, this dialog box should already show the monitor’s native resolution.
  6. Click the Apply button.
    Windows 7 changes the display’s resolution and opens a dialog box that asks whether you want to keep the new settings.
  7. Click the Keep Changes button to keep the new settings or click Revert to return to the old ones.
    If the display becomes unreadable, press Esc to return to the old settings. (Or, if you wait 15 seconds, Windows 7 returns to the old settings automatically.) If you can’t read the screen, you chose a resolution that your monitor can’t display.
  8. When you’re done, click the OK button to close the Display Settings dialog box.
Windows 7 contains many handy keyboard shortcuts, and if you use multiple monitors, there are a couple of shortcuts just for you.
  • If you want to use the Aero Snap feature on the side of the window next to the extra monitor, you'll find that your window will just fall off the desktop and on to the next monitor. To dock the window to either side of a given monitor, just press the Windows key + Left/Right arrows.
  • To quickly jump a window from one monitor to the next, press Windows key+Shift+Left/Right arrow. The window will move to the adjacent monitor.

How to Create a PC Network Workgroup


Adobe CS5 Design Premium All-in-One For Dummies


From Adobe Creative Suite 5 Design Premium All-in-One For Dummies by Jennifer Smith, Christopher Smith, Fred Gerantabee
When you think about manipulating visual media, Adobe CS5 Design Premium automatically comes to mind. The menus in Adobe CS5 applications offer many options and tools to help you edit and install pictures and active graphics. And you can always use shortcuts to work more quickly.

Adobe CS5 Basic Menu Options

Adobe CS5, like any software, gives you menu options to open, close, and save your files. Menu options also enable you to import and export documents and undo changes, in addition to other basic commands. Here's a table that shows common Adobe CS5 options and what they do.
OptionWhat You Can Do with It
NewCreate a new document in the native file format.
OpenOpen a dialog box where you can choose a (supported) file on your hard drive or a disk to open.
CloseClose the current document; if you have unsaved changes, you’re prompted to save those changes first.
SaveSave the changes you’ve made to the current document.
Save AsSave a new copy of the current document.
Place or ImportImport a file, such as an image file or a sound file, into the current document.
ExportExport the current data to a specified file format. You can sometimes select several different kinds of file formats for saving the current data.
CopyCopy the selected data to the computer’s Clipboard.
PastePaste the data from the Clipboard into the current document.
UndoUndo the most recent operation you did in the program.
RedoRepeat the steps you applied the Undo command to.
Zoom InMagnify the document so that you can view and edit the contents closely.
Zoom OutScale the view smaller so that you can see more of the document at a time.
HelpOpen the Help documentation for the current program.

Adobe CS5 Common Keyboard Shortcuts

Like most other applications, Adobe CS5 offers keyboard shortcuts so that you can access features quickly and easily with the touch of a key or two. Explore the Adobe CS5 shortcuts that are used the most by both Windows and Mac users.
CommandWindows ShortcutMac Shortcut
NewCtrl+NCommand+N
OpenCtrl+OCommand+O
SaveCtrl+SCommand+S
UndoCtrl+ZCommand+Z
RedoCtrl+Shift+ZShift+Command+Z
CopyCtrl+CCommand+C
PasteCtrl+VCommand+V
PrintCtrl+PCommand+P
Preferences (General)Ctrl+KCommand+K
Preferences (Flash and Fireworks)Ctrl+UCommand+U
Zoom InCtrl++ (plus sign)Command++ (plus sign)
Zoom OutCtrl+– (minus sign)Command+– (minus sign)
HelpF1 or sometimes Ctrl+?F1 or sometimes Command+?

Adobe CS5 Panels and Their Functions

Knowing how to use the panels in Adobe CS5 can help boost your creativity and make your job easier. Adobe panels offer information and tools to help you add color, align objects, and generally transform your Adobe files (and yes, there is a Transform panel).
Have some fun by exploring these panels:
  • Color: Use the Color panel to select or mix colors for use in the current document. Choose different color modes, such as RGB (Red, Green, Blue) and CMYK (Cyan, Magenta, Yellow, Black), from the panel menu (the arrow in upper-right corner).
  • Info: The Info panel shows you information about the document itself or a particular selection you’ve made. The Info panel includes information on the size, positioning, and rotation of selected objects. You can’t enter data into the Info panel. It only displays (not accepts) information, so use the Transform panel to make modifications.
  • Swatches: You can use the Swatches panel to create a library of color selections, which you can save and import into other documents or other programs. You can store colors and gradients that you use repeatedly in the Swatches panel.
  • Tools: Though the Tools panel (or toolbar) isn’t available in all Creative Suite programs, it’s an extremely important panel in the programs it’s in. A program’s toolbar contains the tools used in that program.
  • Layers: The Layers panel is used to display and select layers. You can also use it to change the layer order and to help select items on a particular layer.
  • Align: Use the Align panel to align selected objects to each other or to align them in relation to the document itself. This panel makes it easy to do precise alignment with multiple objects.
  • Stroke: The Stroke panel allows you to select strokes and change stroke attributes, such as color, width/weight, style, and caps (ends). The program you’re using determines which attributes you can change.
  • Transform: The Transform panel is used to display and change the shear (skew), rotation, position, and size of a selected object in the document. You can enter new values for each of these transformations.
  • Character: The Character panel is used to select fonts, font size, character spacing, and other settings related to using type in your documents.

Adobe CS5 Common Tools

Adobe CS5 is full of tools, most identified with little icons that hint at their functions. For example, use the tool that looks like a brush if you want to create brush marks. (Smart, huh?) Peruse this table that shows the most common Adobe CS5 tools and what each one does.
ToolWhat You Can Do with It
SelectionSelect elements in the document.
MarqueeSelect elements in a document using a rectangular or oval shape.
LassoMake freehand selections in a document.
Magic WandSelect similar adjoining colors in a document.
PencilMake freehand solid marks (with a hard edge) in the document.
PenCreate vector paths in a document.
BrushCreate painterly brush marks in the document; brushes vary in size, shape, and pattern.
TextAdd text to the document.
ShapeCreate various shapes in the document.
ScaleIncrease or decrease the scale (size) of an element in the document.
HandMove the contents of the document for viewing purposes.
ZoomChange the magnification of the document.